Wednesday, July 16, 2014

Summer of Science: Butterfly Kit


When we began our "Summer of Science" I really didn't have exact plans. However, as we began to participate more in the Nature Exchange at the Tulsa Zoo, Evelyn began to shift our exploration more and more into Entomology. As her interest in larval and egg forms of different insects expanded, I started looking for butterfly kits online where you could watch the different life stages of an insect.


The caterpillars arrived along with their kit and Evelyn was immediately engaged. She named all 6 caterpillars: Kirmy, Shirmy, Shanisha, Prince Hans, Bert, and Evelyn Jr.

We watched as they went from tiny little things....


To pupating caterpillars....


To chrysalises...


Then they moved into Evelyn's room in the large butterfly habitat provided by the kit. Until a few days later....


....when Evelyn Jr. emerged as a beautiful butterfly.


Even in the animal world, things don't always go they way you hope developmentally. Poor Bert, as Evelyn called him, was an example of what can happen if a butterfly doesn't fully emerge from its chrysalis correctly. Bert broke the seal on his chrysalis and then got stuck. His wings dried in a crumpled form, making flight impossible and movement difficult. We removed the chrysalis from around Bert once all the other butterflies had safely emerged and placed him in the habitat. He could make it to the feeder and was able to eat so we left him in there. Bert only lived about 2 days (compared to the 2-4 week average life span of a Painted Lady Butterfly) but we learned a lot about caring for special needs animals. We discussed the importance of development in animals and how amazing it is that so many times, everything works just right.


Evelyn drew the caterpillars throughout their life cycle and focused on using vocabulary (like pupate, proboscis, chrysalis, emergence) while I took it a step further and recorded data for growth for the caterpillars. I was amazed at how much I did not know about caterpillars. I recommend this kit for adults and children. I promise you will learn something, especially if you haven't done this since Kindergarten.

Wednesday, June 18, 2014

Summer of Science: The Life Cycle of a Squash Bug

Evelyn and I love spending time in Grandma's garden. We check over the plants, look for any fruits or vegetables that are ready to harvest, and observe wild life whenever possible.

Two days ago, we were observing Grandma's Squash plants when Evelyn and I noticed some insect eggs on the top of a squash leaf.


What kind of eggs were these? Evelyn thought they looked similar to mouth eggs, but were maybe a different shape. We needed more information. We began looking for more eggs as I got out my science notebook. We wanted to know if these eggs were on all of the plants. I made a chart that listed the type of plant, number of egg clusters, and description of the egg clusters. The squash ended up being the only plant type with these eggs and it had 8 clusters.

As we examined more of the squash plant we lifted up a leaf and discovered...THIS


We found a group of baby bugs clustered together near other egg clusters.

We now had three clues. These bugs lay their eggs on squash plants, have amber eggs, and now we knew what the baby bugs looked like.

A brief online search brought up what we were looking at. Squash bugs. These bugs destroy squash plants. Last year the squash died off before we got any squash off of them. Reading about the squash bugs, we now think we know why.  The second generation of squash bugs will lay more eggs, and then those hatchlings will burrow underground for the winter. When spring comes, they tunnel back up and lay eggs in the same area on squash again.

So these may very well be the decendants of last years squash killers. Having identified the bug, Grandma went and bought appropriate pesticides to allow the squash to be food safe and squash bug safe.

We also captured two adult squash bugs and made a kill jar. We killed them in fingernail polish remover and have them in a container now to take to the Nature Exchange at the zoo so Evelyn can share what we've learned with the Exchange.

Since we found examples of all 3 life cycle stages of the bug, Evelyn's science journal entry on Squash Bugs is about the Squash Bug Life Cycle. 


I sketched images of what we saw and Evelyn colored it, but she does like explaining the life cycle using the picture in her journal.

We also now have a bug net and bug observation box. Turns out bugs aren't "icky" when you are learning about them and now our outdoor time is filled with calls of "Mom! Look at this really cool insect!"


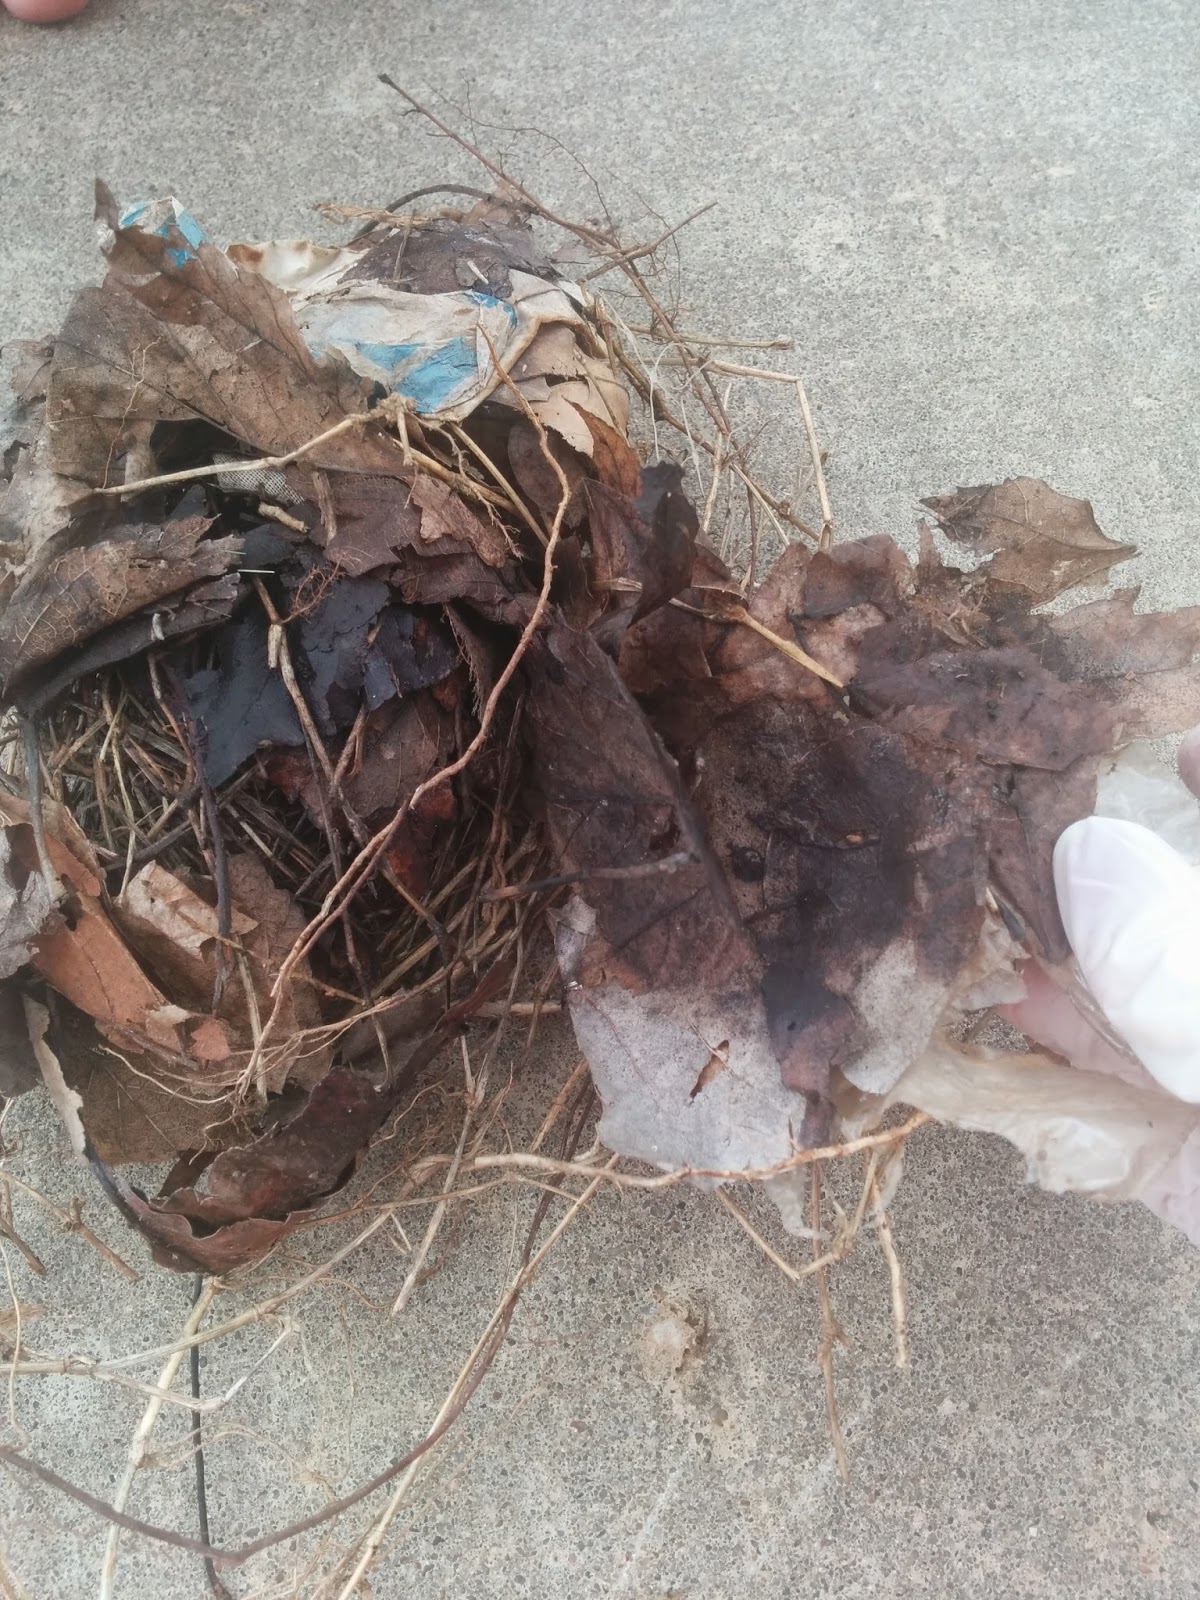
Summer of Science: Bird Nest Dissection


With all of the storms and high winds that came late spring, my mom ended up losing a tree branch that had housed a bird nest. When she discovered it she brought it over for Evelyn to look at. 

We decided that it would be interesting to see what birds use to build their nests by taking apart this one.


Our nest consisted mainly of wet and decomposing leaves around the bottom of the nest. The leaves contained tons of little pill bugs, which Evelyn likes holding.


Evelyn had to hold all of them.


We also discovered that the nest was made of twigs and long, dried grasses that were wrapped around and around. The eggs that were left in the nest were hallow, smelly, and had dried yoke on the outside. We decided they were probably eaten by a predator.


The most interesting thing we found was a plastic walmart sac that had been woven into the birds nest. 

Saturday, June 7, 2014

Basic Addition and Proof

Evelyn can do basic addition mentally. She occasionally utilizes finger counting to check her work, but prefers to simply count on in her head. (for example, she thinks 3 + 2, so 3, 4, 5. 5!)

When it comes to explaining how she knows her answer is correct, she struggles. I want her to be able to explain her strategies and thinking in mathematics, so today we worked on an activity to help her prove her answers when she completes addition problems.

Here was our set up.

The notebook has number sentences for basic addition ("2 + (numbers 0-12) =")

I color coded the addends so that one addend was blue and one addend was yellow. Then I drew green lines underneath the blank space for the sum.

I also provided silicon muffin cups in blue, yellow, and green. (Makes sense because yellow and blue make green, right?)


I added a plus sign and an equals sign to help keep the number sentence structure consistant.


For the addition problem 2 + 4 =, the set up looks as follows:


Then Evelyn would combine the blue and yellow containers by pouring both into the green container.

She could then count the number of pennies in the green container to prove her sum she discovered mentally was correct.


 Tomorrow, Evelyn will rewrite the math sentences to practice writing numbers and math symbols.

Bonuses of this activity:

  • I was able to observe different addition strategies being used. Sometimes Evelyn would use her "count on strategy" by using one addend she knew ("there are 6 pennies in the yellow, so if I add the other two...7, 8, then my answer must be 8!"). When making 10 pennies to put in an addend container Evelyn put two sets of five because she knew five and five made ten, etc.
  • This lesson lends itself to understanding the commutative property of addition since it is easy to realize that it doesn't matter what order you dump your addends in the green container, you still arrive at the same sum.
  • There is a lot of opportunity to talking about conservation of number. You cannot add or take away any pennies when pouring from your addends to your sum. Only the pennies in the addend containers can go into the sum container. 
  • It provides a hands-on way to prove basic addition problems while relating them to written number sentences.


Friday, June 6, 2014

Summer of Science: Floating and Sinking

When I taught 5th grade Science we had an entire unit on Floating and Sinking. It seems a little silly to me that we are teaching concepts regarding bouyancy as late as 5th grade, however there were several students who still didn't have enough experience with density as a property to understand that it was more than an objects size or weight that determined whether it would float or not. Therefore, it is never to early to start providing those experiences.

Today for science time, we did an activity to test out some household items and whether they would float or sink.

I pulled some assorted items:


We have here:
A leaf, an outlet cover, a silicon muffin cup, a rubber band, a knife cover, a paper clip, a quarter, a plastic lid, and a penny


I set up a testing station with a bucket of water, slotted spoon for item retrieval, absorbent pad (this is designed to set washed fruits and vegetables on without leaving water all over your counter) and a dish towel.

We set up our journal page to record the object and whether it was a prediction or a result and then provided two columns: one for floating, one for sinking.


At the end of my page in my journal, I recorded what I noticed about the objects that float and what I noticed about the objects that sank. In the remaining space, I recorded the definition for the word "Density". If I were doing this with a class, I would have provided that vocabulary word at some point when students described the idea, so this seemed a logical place to write it.

Evelyn's journal looked slightly different.


I had her draw her own dividing lines and also fold her paper to create columns. I wrote the words in and checked where she told me to for each guess and result she had. I did, however, make her write the date. I'm pretty big about writing the date on things. It's a habit I want her to have early.

Then to help her reflect, we simply talked about what she learned and I wrote down what she said.

Evelyn was focused on "plastic" vs. "metal" as she classifies the two things. She said plastic floats and metal sinks. When she got to the rubber band, she determined that rubber is like plastic and then predicted from that association that a rubber band would float like the plastic did.

 Then I created a t-chart and asked her to write three things that she discovered would sink and three things that would float. (Writing practice anyone?)


To help her with item spellings, I put my journal under hers with the desired item lined up at the top. She could then look to see what order her letters needed to be in.  


Her results.


This was kind of lack luster compared to the excitement that was leaf rubbings yesterday, but it was raining and wet outside so this was a decent substitute for outdoor science observations.

Store this in rainy day plans! We can repeat it with different items. Maybe try a deflated balloon and a blown up balloon or test a piece of cloth and watch what happens over time!


Thursday, June 5, 2014

Summer of Science: Leaf Rubbings

One of the tools that I would like to improve at using in my classroom is a Science Notebook. I know that last year I tried to work on building science journals with my students but I didn't have a narrow enough focus to really have the journals become useful.

So I decided that I would start keeping one of my own, as an adult, to see how I used it in real life and what I would like it to look like.  As always, I decided that if I can do it, Evelyn can do a kid version of it.

Today we had our first "science time". I started small with something easy: leaf rubbings!


The first thing we did was write the date in the upper right hand corner of our journals. Then, we picked a leaf. I showed Evelyn how to put it on the page under the one you want the image on and to place the leaf smooth side down so you get the best product possible. Then I helped her hold her page while she creating a rubbing.


We repeated this process in our notebooks until we had a sample from each of the trees out our house.


For Evelyn, the pictures we created were enough. I wanted to go through and identify the exact species of tree that each of them came from.

Arborday.org has program on their website that allows you to identify trees based on repeated classification, sort of like a dichotomous key.

While examining one of our little specimens, we discovered something amazing!
EGGS!


These were on the bottom of a leaf from our Pecan Tree. Evelyn remembered from the book Eggs we checked out from the library that these were insect eggs and probably a moth egg. 

And let me tell you - those eggs REALLY got Evelyn and I's research drive into gear!

We landed on this website:
www.mywildlifefriendlygarden.com

In this post the author discusses moth eggs and has several pictures. At the bottom we really enjoyed the photo showing moth eggs over time. We learned that moth eggs are white when they are laid but gradually change color as the larvae grow until they are ready to hatch out!  We think ours were at the hatching stage and upon closer look, think several may have already hatched.

Just a day of leaf rubbings that turned into some pretty fun scientific research.

Here are my pages from the leaf rubbing:

I learned the words "lobe" and "sinus" as they relate to leaf shape descriptions.


I noticed that there were different patterns to the leaf veins in the Crepe Myrtle and Peach Tree Leaf. 


Now I'm working on reflecting on the day. I'm going to add what I learned about the eggs and tape in our photograph of the eggs we observed along with one of moth eggs at different stages.

Evelyn's book just has the different rubbings she did. Her descriptions are things like "big", "green", "small", and "round" which are perfectly find at her age. Good practice regardless...and dare I say...fun?

Writing Process from an Early Age

Evelyn is not a fluent reader by any means. She can write letters when you spell something for her. She makes wonderful inferences from illustrations and photographs. Using those strengths, it is quite possible for her to be a writer. 

This project requires:
Strong parent support and involvement
Printer
Camera
Paper
Pencil
Publishing Supples (I recommend a small binder, page protectors, and stickers)
A story worth telling

A lot of the students I work with struggle with the idea that revisions and proof-reading matter. They turn in their rough draft equivalents without giving a second thought to the quality of their writing. I want Evelyn to begin her writing experiences with the idea that your best work is often not your first work.

So we decided a few weeks ago that it would be nice to write a book about going to the library to share with her classmates. 

Evelyn loves the Summer Reading Program and many of her friends haven't done it before so she wanted to tell them about the library so they would maybe try the reading program.

With this idea in hand, we started recording ideas. We would go to the library and then I would ask Evelyn what she liked about the library or what was important about the library. I'd record her statements using my phone's voice recording system. There were some real gems.

When it was finally writing day, we went to the library. We took pictures while we were there of all of the things Evelyn thought were important. When we got home, we printed off the pictures.


I printed off two pictures per page so they were about 5 x 3 photos. Then we cut them out and laid them on a table with plenty of space.

Here's were early literacy skills come in. Ordering events is an important skill. So step 1 for Evelyn was to put the printed pictures in the order of the steps we follow when we go to the library.


She worked hard to get them just the way she wanted. When she felt she was done we would go through and talk about what was happening in each picture to make sure that it made sense. This allowed her to correct anything that wasn't exactly where she thought was best.

When she had successfully ordered her photos, we wrote our rough draft. I asked her to tell me the story of going to the library using each picture. I wrote down the words she spoke as her first rough draft. 

Once we had the first draft, we talked about using transition words.  She had worked on transition words at school this was easier for her. We made those adjustments to make our story clear. Then we went through and changed some of our pronouns. We talked about sentences like "I read it at home." What we really want to say is "I read a book at home" or "I read my new book, The Rainforest at home." After changing our rough draft to include clearer words, we were ready for the next step.


I typed all of the rough draft sentences we had written, putting line breaks in between each sentence. I also typed all of our sentences from our "Pre-Writing" where we had recorded her ideas about the library on my phone. Then I printed them and cut out the pieces of paper so we had one sentence on each strip.

Next, I read each sentence to Evelyn and she placed the sentence underneath the photograph she thought it made the most sense with.


When pages had more than once sentence, we went through and read the sentences again to make sure they were in the right order. Some sentences needed to go before others.


Now that we knew how we wanted our sentences to look on each page, I typed a final copy for her to put in her book next to the pictures and we went shopping.

We picked a nice little two ring binder that was purple and some page protector sheets that fit inside it. We also got letter stickers and decorative stickers for the book.

Evelyn and I put the pages in her book together and then I worked on putting her title on the spine and front of the book while she illustrated a cover. (It's our car and the two of us in it on the way to the library). Then she put her decorative stickers in her book.


The last step for us was to create a dedication page. Evelyn wanted to dedicate her hard work on this book to her friends at her preschool.


Once we finished the book, we brainstormed ideas for the next one she'd write. Her favorite proposal so far is Evelyn and Dad go to Starbucks.

Here is the proud author with her finished work.